Following on the heels of the very popular DJI Mini 3 Pro is its successor, the Mini 4 Pro.
With its innovative gimbal that allows the camera to physically shoot vertical footage and the omnidirectional obstacle avoidance system, it is ideal for those new to flying drones, social media and solo content creators, travel bloggers, and more.
To ensure the DJI Mini 4 Pro is functioning correctly and consistently, there may be times in the near future when various important calibrations should be made.
This article and the included YouTube video will briefly discuss various issues that may arise within the Gimbal, IMU, and Compass, and serve as a step-by-step guide for calibrating your Mini 4 Pro Gimbal, IMU, and Compass.
We’ll now look at why these various calibrations would need to be performed, followed by how to calibrate the Gimbal, IMU, and Compass using the DJI Fly app.
To help, we’ve identified and reviewed the best drone courses for beginners and professionals.
Gimbal Calibration
For those unaware, the gimbal on DJI drones has two specific purposes:
- Serving as a physical attachment point for the camera to the drone
- Providing 3-way camera stability
The gimbal is used to ensure smooth and level video footage and level photos.
If the gimbal on the DJI Mini 4 Pro is off-center or slightly misaligned while in use, it could cause extra work in post-processing software to get corrected (i.e., DaVinci Resolve, Final Cut Pro, Lightroom, Photoshop, etc.)
Because gimbal calibrations are related to the drone’s camera, unlike the IMU and compass calibrations, gimbal calibration does not affect how the Mini 4 Pro flies.
The gimbal does a self-check each time the Mini 4 Pro is turned on.
However, if you find that the camera on your Mini 4 Pro has trouble staying level (uneven horizon) or wanders occasionally during flight, then it is time to manually calibrate the gimbal through the DJI Fly app.
» MORE: What Is a Gimbal in Drones? (Explained for Beginners)
To calibrate your Mini 4 Pro’s gimbal:
STEP 1: While the Mini 4 Pro is off, remove the gimbal cover.


STEP 2: While on a flat surface, power on the DJI RC 2 or RC-N2 that you regularly fly your Mini 4 Pro with.


STEP 3: Power on the Mini 4 Pro. After the DJI RC 2 or RC-N2 connects to the Mini 4 Pro, it may automatically switch over to Camera View. If you are not brought to the Camera View, tap GO FLY.


STEP 4: Once in Camera View, go into the Fly app menu/options by tapping the three dots in the upper right-hand corner.


STEP 5: Locate and tap the Control Tab. Scroll down until you see Gimbal Calibration. Next to that press the arrow to the right and choose Auto to automatically calibrate the gimbal.


Alternatively, you can choose to manually calibrate the gimble. If you choose Manual, you will be able to define the Horizontal and Yaw values to get your horizon level.
This is handy for when in the air and you need to calibrate on the fly.


» MORE: DJI Mini 4 Pro: How to Update Firmware (Step-by-Step Guide with Video)
IMU Calibration
The job of the Mini 4 Pro’s Inertial Measurement Unit (IMU) is to ensure that the Mini 4 Pro is level and stable in the air. It accomplishes this by monitoring the drone’s velocity, angle, force, and attitude.
To monitor these areas, the IMU constantly checks the Mini 4 Pro’s accelerometer, barometer, gyroscope, and thermometer. If any of these systems are malfunctioning and not corrected, the Mini 4 Pro could:
- Tilt while hovering
- Have difficulty remaining steady and stable in the air, and/or, in rare cases,
- Display signs of difficulty cooling down
By calibrating the Mini 4 Pro’s IMU, preferably when prompted, you can reduce sensor errors and have an overall better flying experience.
DJI suggests IMU calibration whenever you fly outside of a 30-mile radius of your last flight and every 1,000 ft of elevation change.
Again, this is the manufacturer’s suggestion. Many drone operators do not perform these steps unless needed or prompted by the DJI Fly software.
» MORE: DJI Air 3: How to Calibrate Gimbal, IMU, and Compass (Explained with Video)
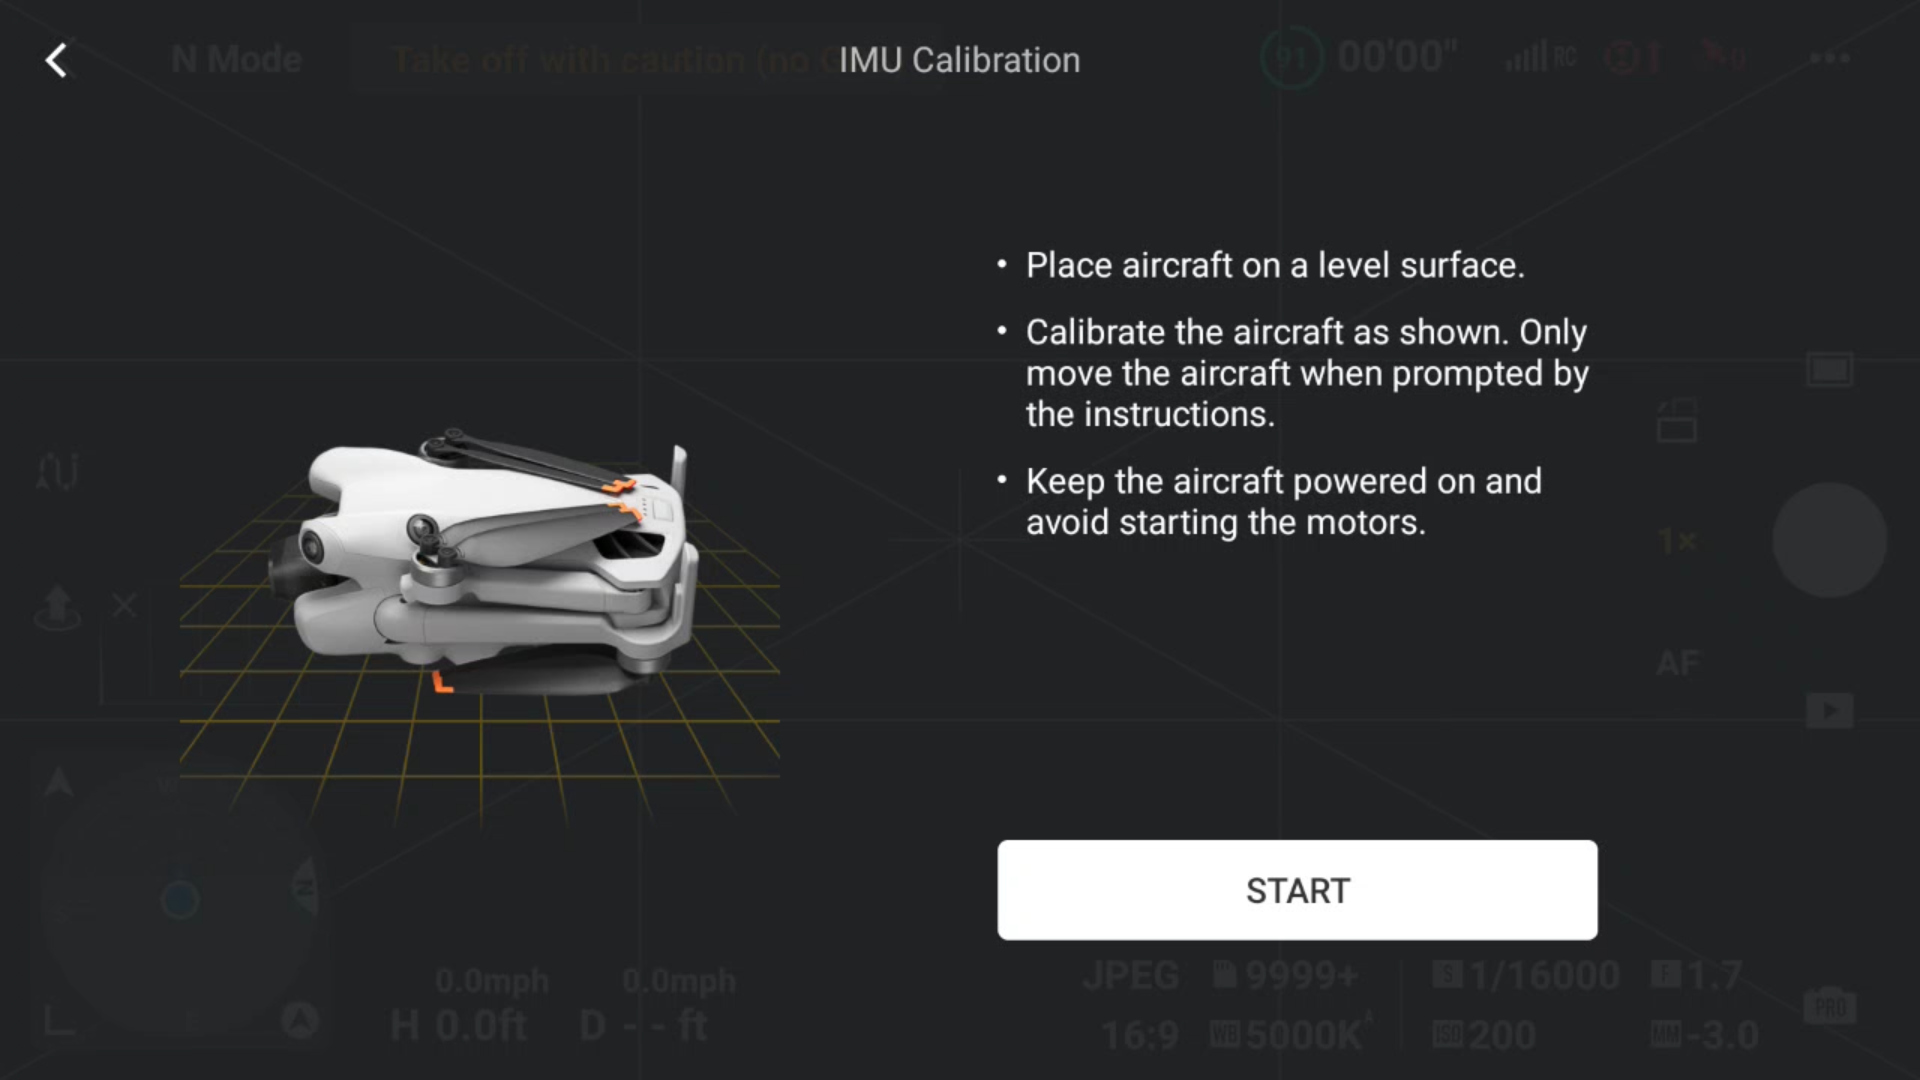
To calibrate your Mini 4 Pro’s IMU:
STEP 1: While the Mini 4 Pro is off, remove the gimbal cover. This will ensure that when the Mini 4 Pro is turned on, the movement of the gimbal will not be impeded.
STEP 2: Power on the DJI RC 2 or RC-N2, whichever you use regularly. If using the RC-N2, also launch your DJI Fly app.
STEP 3: Power on the Mini 4 Pro. After the DJI RC 2 or RC-N2 connects to the Mini 4 Pro, it may automatically switch over to Camera View. If this does not automatically occur, tap GO FLY.
STEP 4: Once in Camera View, go into the Fly app menu/options by tapping the three dots in the upper right-hand corner.
STEP 5: Locate and tap the Safety Tab. Scroll down until you see IMU Normal. Next to that, press Calibrate to enter the IMU Calibration process.


STEP 6: Press Start, then follow the prompts and move the Mini 4 Pro into the various positions as directed on the screen.

» MORE: DJI Mini 3 & Mini 3 Pro: How to Calibrate IMU, Compass, and Gimbal (Video)
Compass Calibration
The Mini 4 Pro’s compass is exactly what one would expect of a standard compass one might bring on a hike. It is an internal digital device that helps the Mini 4 Pro know where it currently is, location-wise.
Uncalibrated drones may fly erratically or eventually crash due to a loss of control.
Because of this, drone manufacturers, including DJI, suggest a compass calibration be done whenever you fly outside of a 50-mile radius of your last flight (up from the 30-mile radius of the IMU) and every 1,000 ft of elevation change.
Many drone operators calibrate their drones only when prompted. We recommend performing what works for your situation.
When calibrating your Mini 4 Pro, make sure you are away from any metals or areas with strong interference. These areas include most parking garages, as oftentimes, these are full of structural rebar that could cause interference with the calibration process.
» MORE: Holy Stone HS720E Troubleshooting
To calibrate your Mini 4 Pro’s compass:
STEP 1: While the Mini 4 Pro is off, remove the gimbal cover.
STEP 2: Power on the DJI RC 2 or RC-N2 with which you regularly fly your Mini 4 Pro. If using the RC-N2, you’ll need to launch your DJI Fly app.
STEP 3: Power on the Mini 4 Pro. After the DJI RC 2 or RC-N2 connects to the Mini 4 Pro, it may automatically switch over to Camera View. Tap GO FLY if you are not automatically brought to the Camera View.
STEP 4: Once in Camera View, go into the Fly app menu/options by tapping the three dots in the upper right-hand corner.
STEP 5: Locate and tap the SAFETY Tab. Scroll down until you see Compass Normal. Next to that, press Calibrate to start the Compass Calibration process.


STEP 6: Press Start and then follow the prompts and move the Mini 4 Pro into the various positions as directed on the screen.

