DJI continues to release consumer drones at an advanced pace, and the Mini 4 Pro is no exception.
Released in September of 2023, the DJI Mini 4 Pro is a capable update to the innovative one-and-a-half-year-old DJI Mini 3 Pro.
One of the main areas in which the Mini 4 Pro has been upgraded is the obstacle avoidance sensors.
Instead of a three-way obstacle avoidance system found on the Mini 3 Pro, the DJI Mini 4 Pro has omnidirectional obstacle avoidance.
This new obstacle avoidance system ensures the Mini 4 Pro has 360-degree protection. With this new system also comes other updates and additions to the current safety options for the Mini 4 Pro.
This article and the included YouTube video will discuss the various safety features of the DJI Mini 4 Pro and show how to:
- Set up obstacle avoidance
- Set RTH (Return to Home) options
- Update the home point
- Set the Mini 4 Pro’s maximum altitude
- Enable augmented reality (AR) settings and more
To help, we’ve identified and reviewed the best drone courses for beginners and professionals.
The Safety Tab
To access and modify the safety features of the DJI Mini 4 Pro, you will need to be in the Safety tab to make the necessary adjustments.
To access the safety tab, both the Mini 4 Pro and DJI RC 2 or RC-N2 will need to be powered on and connected to the DJI Fly app.
Go into the Fly app menu/options in the Camera View screen by tapping the three dots in the upper right-hand corner.
You’ll want to be in the Safety Tab. If you are in another tab, simply press the Safety tab.
» MORE: Drone Safety Features (All You Need to Know)
Flight Assistance
The first area we’ll be looking at is the Flight Assistance options. These include:
- Obstacle Avoidance Actions
- Bypass Actions
- Display Radar Map
Obstacle Avoidance Action
The obstacle avoidance action is broken into three separate options and determines the behavior of the Mini 4 Pro when obstacles are detected.


Before flying, you’ll want to define what the Mini 4 Pro will do once it approaches an obstacle.
The available actions are:
- Bypass – When enabled and controlling the Mini 4 Pro, the Mini 4 Pro will automatically go around detectable obstacles. If there is no available way to do so, the Mini 4 Pro will then hover until action can be taken by the drone pilot.
- Brake – When the brake action is enabled, the Mini 4 Pro will automatically stop and hover when encountering obstacles. You will then be able to determine the best course of action to take.
- Off – Turns off all obstacle avoidance systems. With this action, the Mini 4 Pro can run into obstacles in the environment. Some drone pilots, like myself, use this option when flying in tight spaces.
» MORE: Obstacle Avoidance in DJI Drones (Explained for Beginners)
Bypass Actions
Baypass Actions dictates how the Mini 4 Pro behaves when bypassing obstacles.
- Normal – The Mini 4 Pro will look for objects and obstacles before reaching them, staying a safe distance from the obstacle(s).

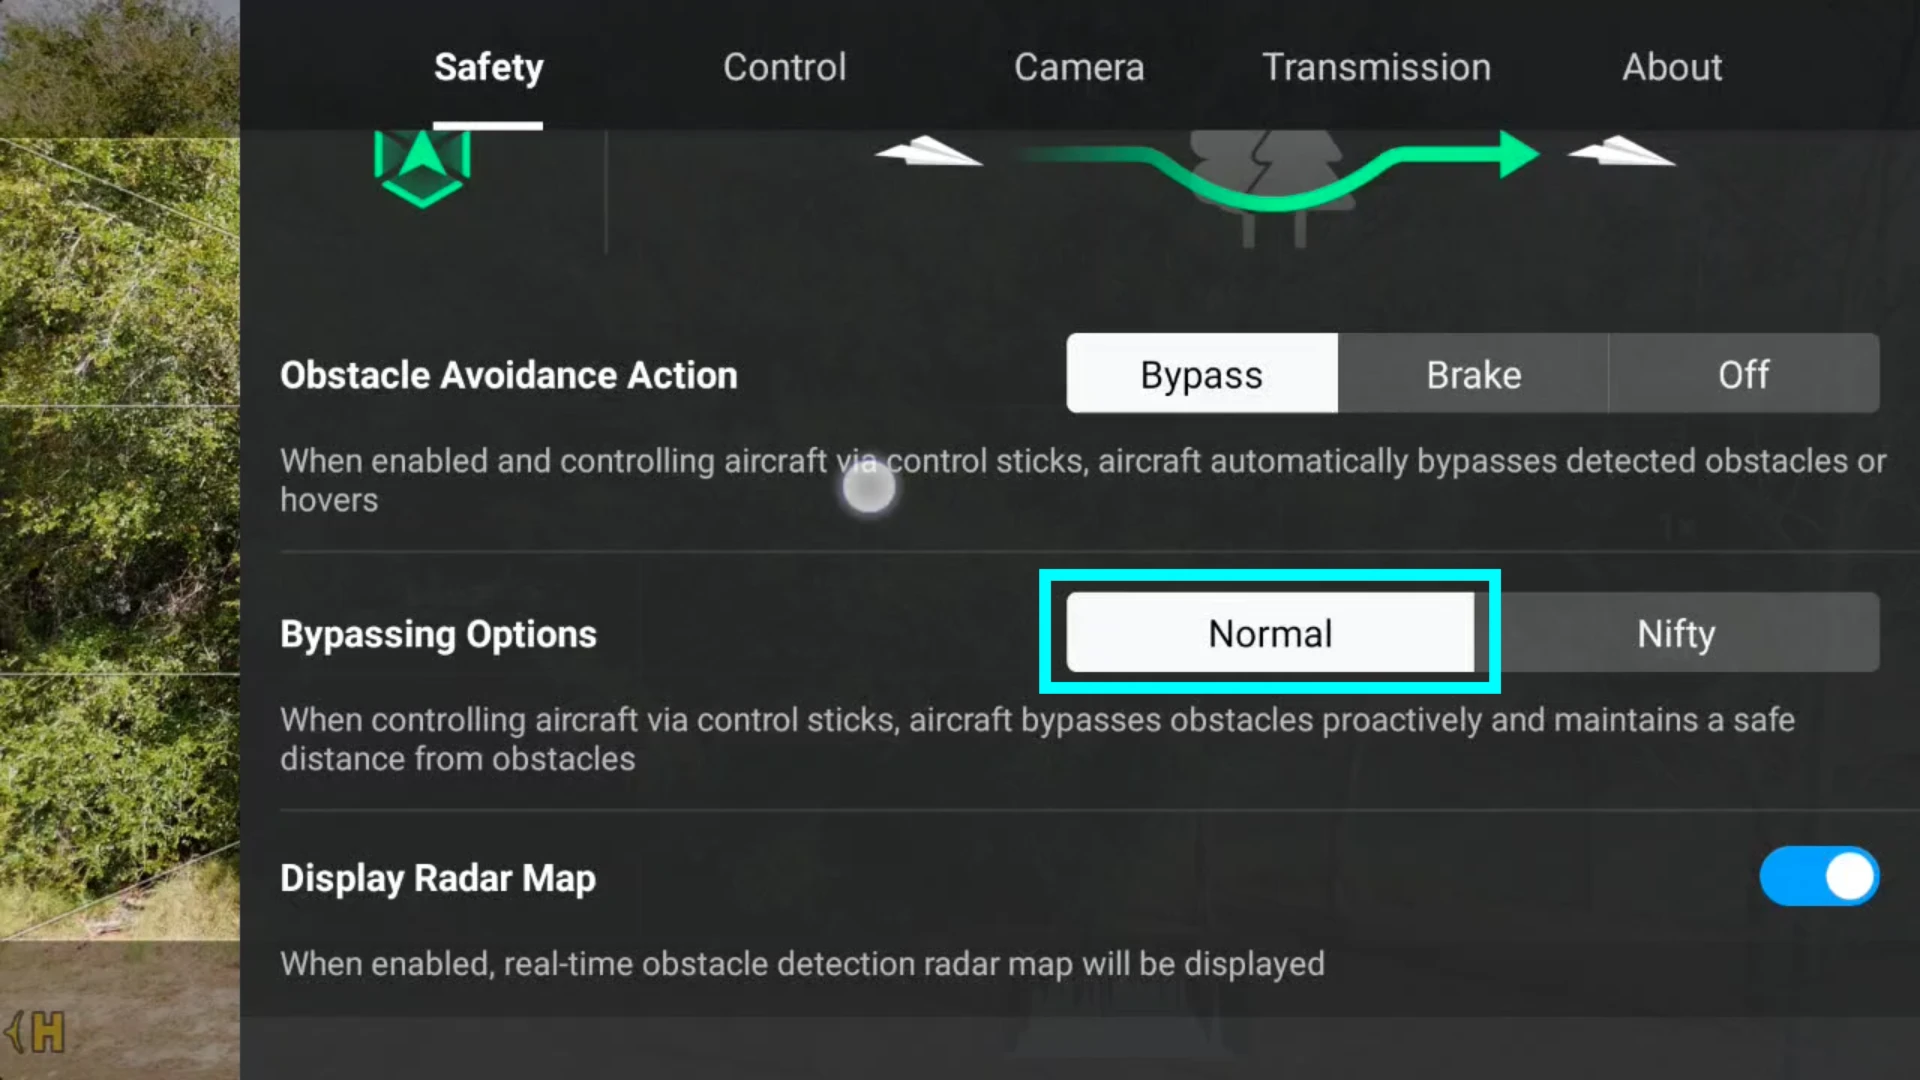
- Nifty – This is sort of like Cine mode for the Bypass action. When enabled, the Mini 4 Pro will avoid obstacles with more laid-back and smooth movements. However, this Bypass option has a higher chance of colliding with obstacles.


Display Radar Map
The Radar Map (which can be toggled on and off) is an on-screen aid used to quickly alert you to how close the Mini 4 Pro is to objects.
This is done through the use of the colors orange or red, depending on how close the drone is to an object.
When close to an object the radar turns orange and gradually turns to red as the Mini 4 Pro flies dangerously close to the object.

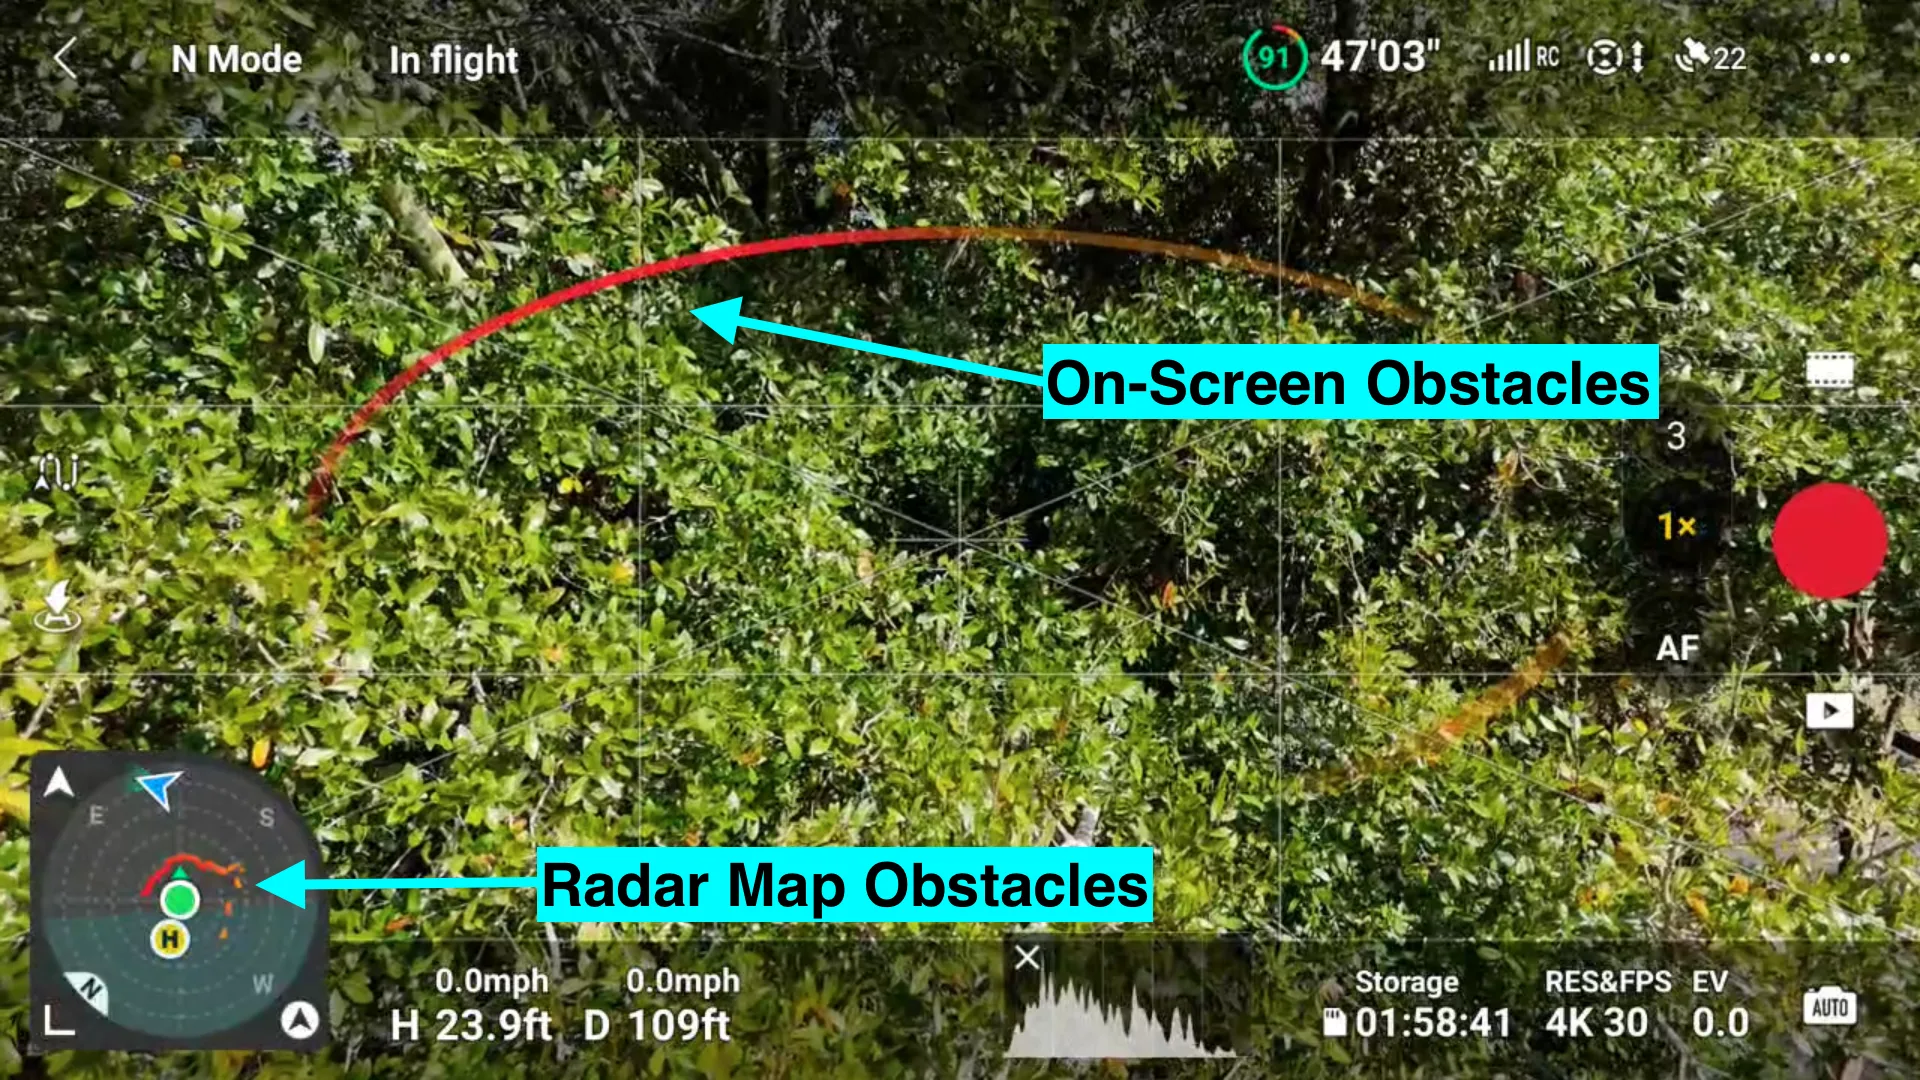
The Radar Map is particularly useful for those who turn off all obstacle avoidance and fly close to objects in the environment, or fly through tight areas and spaces.
At the bare minimum, the Radar Map will give a visual warning of obstacles.
» MORE: DJI Mini 3 / Pro – Map and Radar Explained (Video)
Return to Home (RTH)
Return-to-home (RTH) will return the Mini 4 Pro to the recorded home point without any additional input from you.
In this section, you’ll want to set the options for Advanced RTH.
Advanced RTH
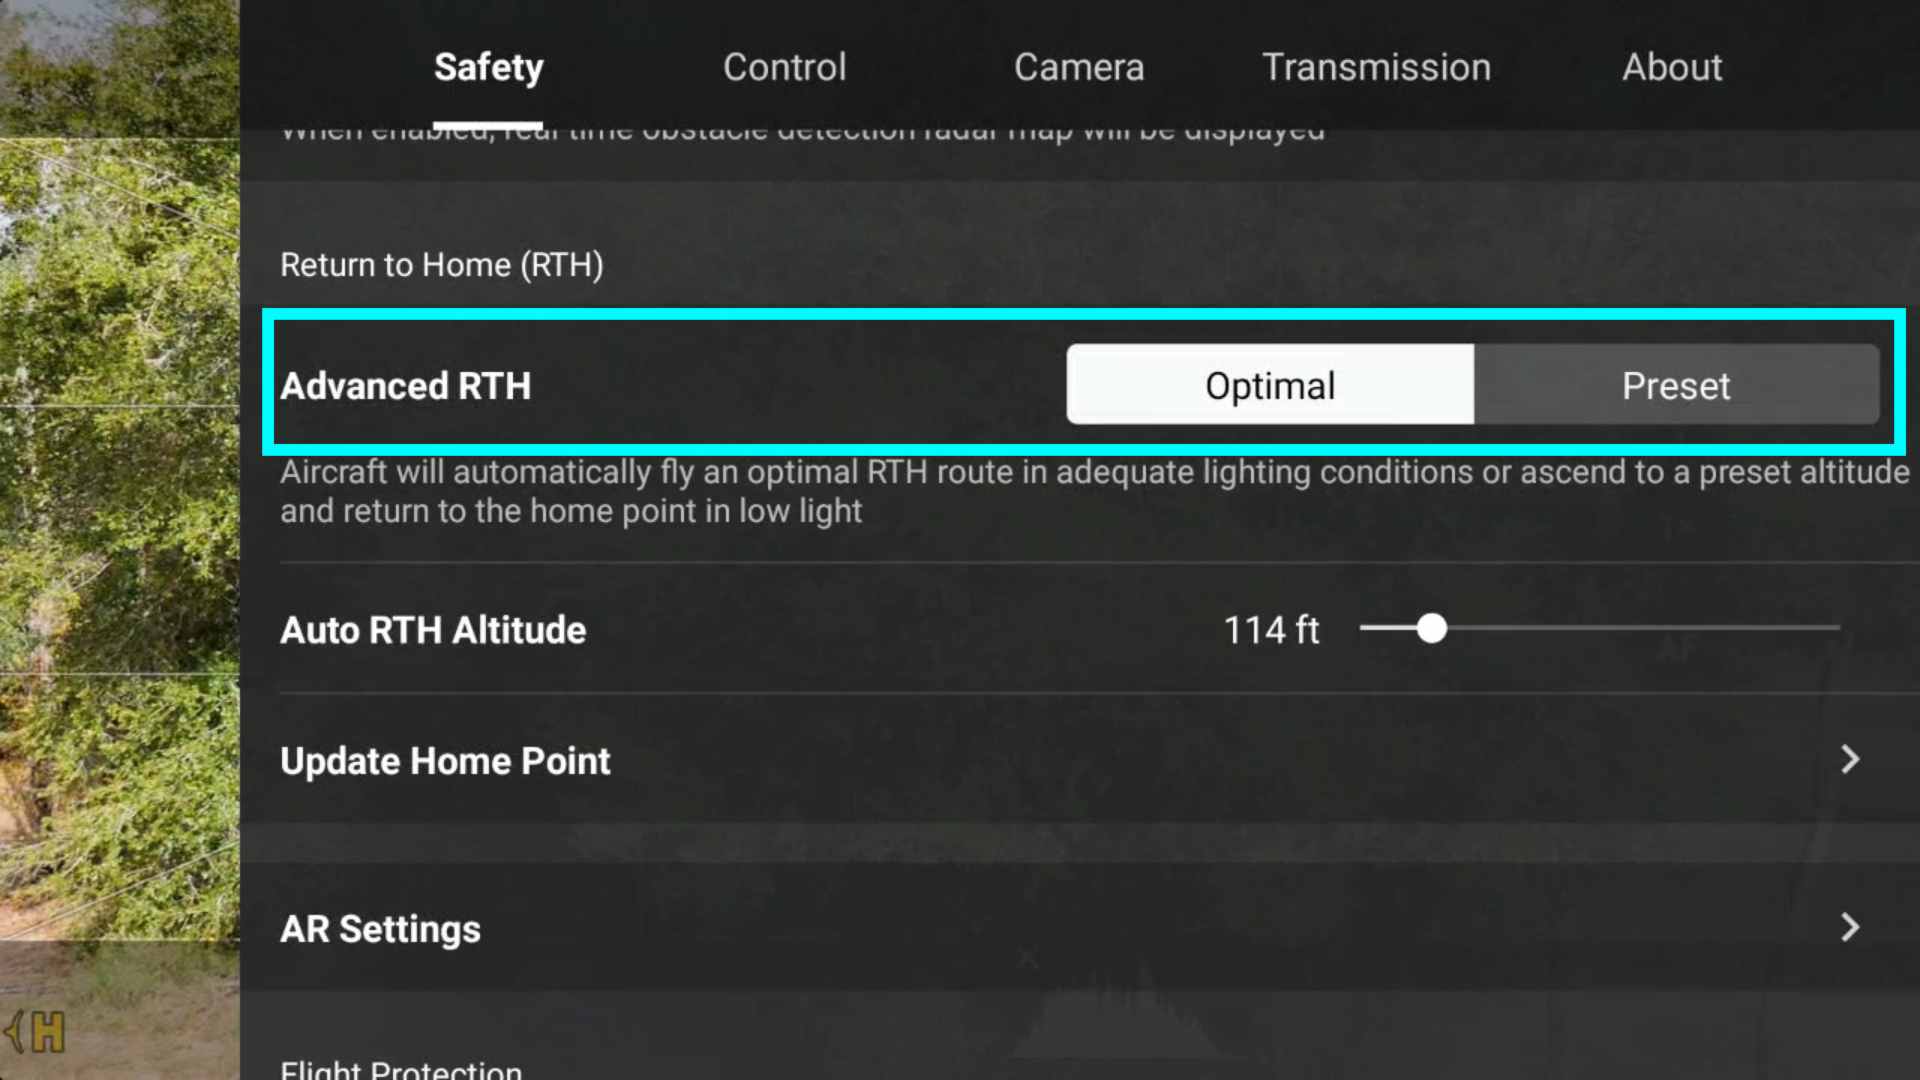

There are two settings available for Advanced RTH. These RTH settings are:
- Optimal
- Preset
» MORE: Does DJI Air 3 Have Return to Home (Explained)
Optimal Advanced RTH
When in Optimal Advanced RTH, the Mini 4 Pro plans the best route for it to get home, regardless of any RTH height options previously input.
It will adjust its height to get above, below, or around any type of obstacle or interference signal in the area that could disrupt a successful RTH.
With the optimal setting chosen, the Mini 4 Pro will use the straightest and most direct route to RTH to save on battery power, increasing the amount of time the Mini 4 Pro can fly.
This may possibly even save the Mini 4 Pro if the batteries are low.
If it is too dark for the Mini 4 Pro’s vision sensors, the Mini 4 Pro will default to a variation of Preset mode, with preset altitude options, which we’ll look at.
Preset Advanced RTH
In this mode, the Mini 4 Pro will return home at the preset height.
As a rule of thumb, I set my Auto RTH Altitude to 30 feet or so above the highest obstacle wherever I might be flying for the day.
If the Mini 4 Pro is in Optimal Advanced RTH when the lighting conditions are too poor for the Mini 4 Pro’s vision system to see its way home, the Auto RTH Height will be used.
» MORE: DJI Air 3: How to Set Up Safety Features (Step-by-Step Guide with Video)
Auto RTH Altitude
The Auto RTH Altitude is an essential option to set.
The reason is that in the event of an emergency (we’ll touch on this shortly), you’ll want the Mini 4 Pro to have sufficient height when returning home.
As a rule of thumb, setting your return-to-home height a fair bit higher than the tallest obstruction in your area is always good.

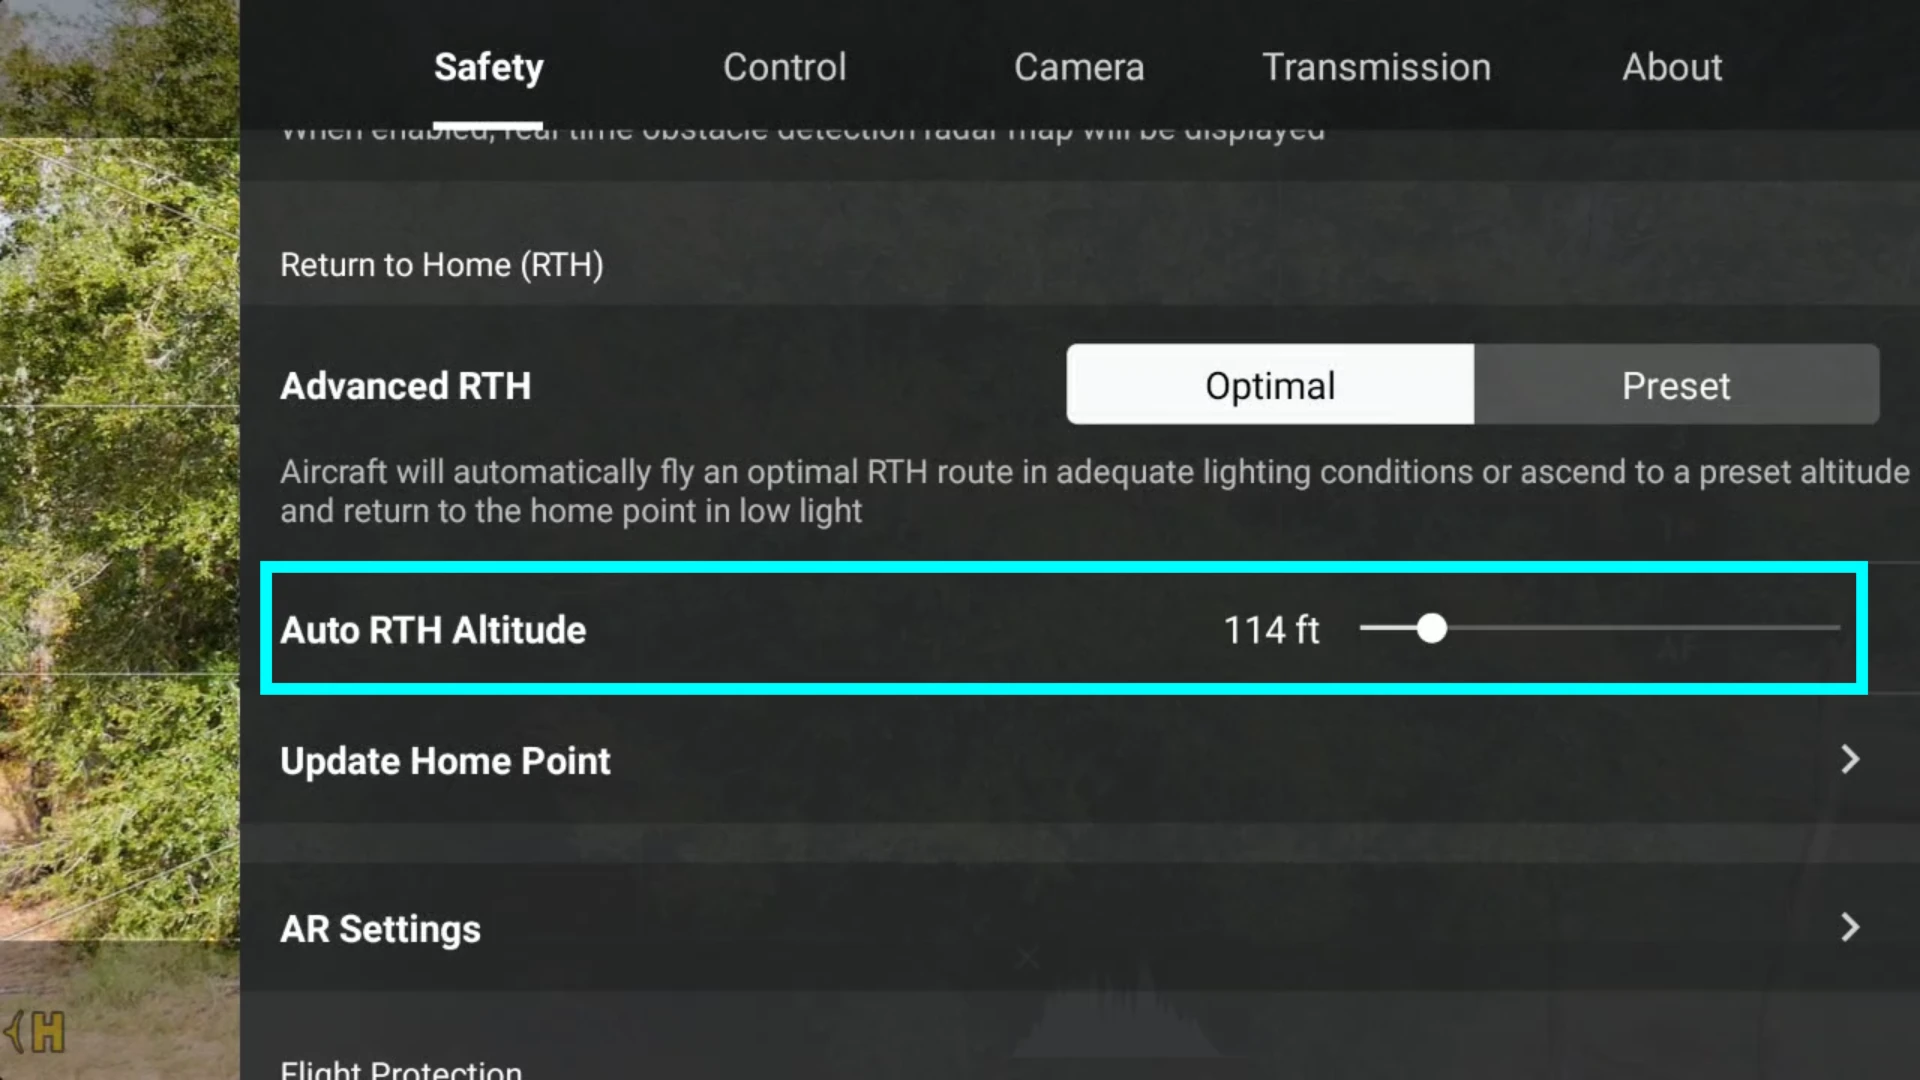
Some simply set their RTH altitude to the maximum flight ceiling in the United States (400 feet) and just go.
This can be dangerous if the Mini 4 Pro is returning home and there are low-flying aircraft in the vicinity.
» MORE: 5 Essential Safety Rules You Need to Consider When Filming with a Drone
Update Home Point
Updating the home point allows you to change your home point from where it was automatically set in the DJI Fly app upon acquiring a GPS signal and set it where you want it.
This is especially useful if you find yourself moving from one location to another rapidly while flying, perhaps when on a boat or another moving object.
The home point can only be moved once the drone is in the air and has a full GPS lock.
To update the home point:
STEP 1: While in the air, press the arrow to the right of Update Home Point.
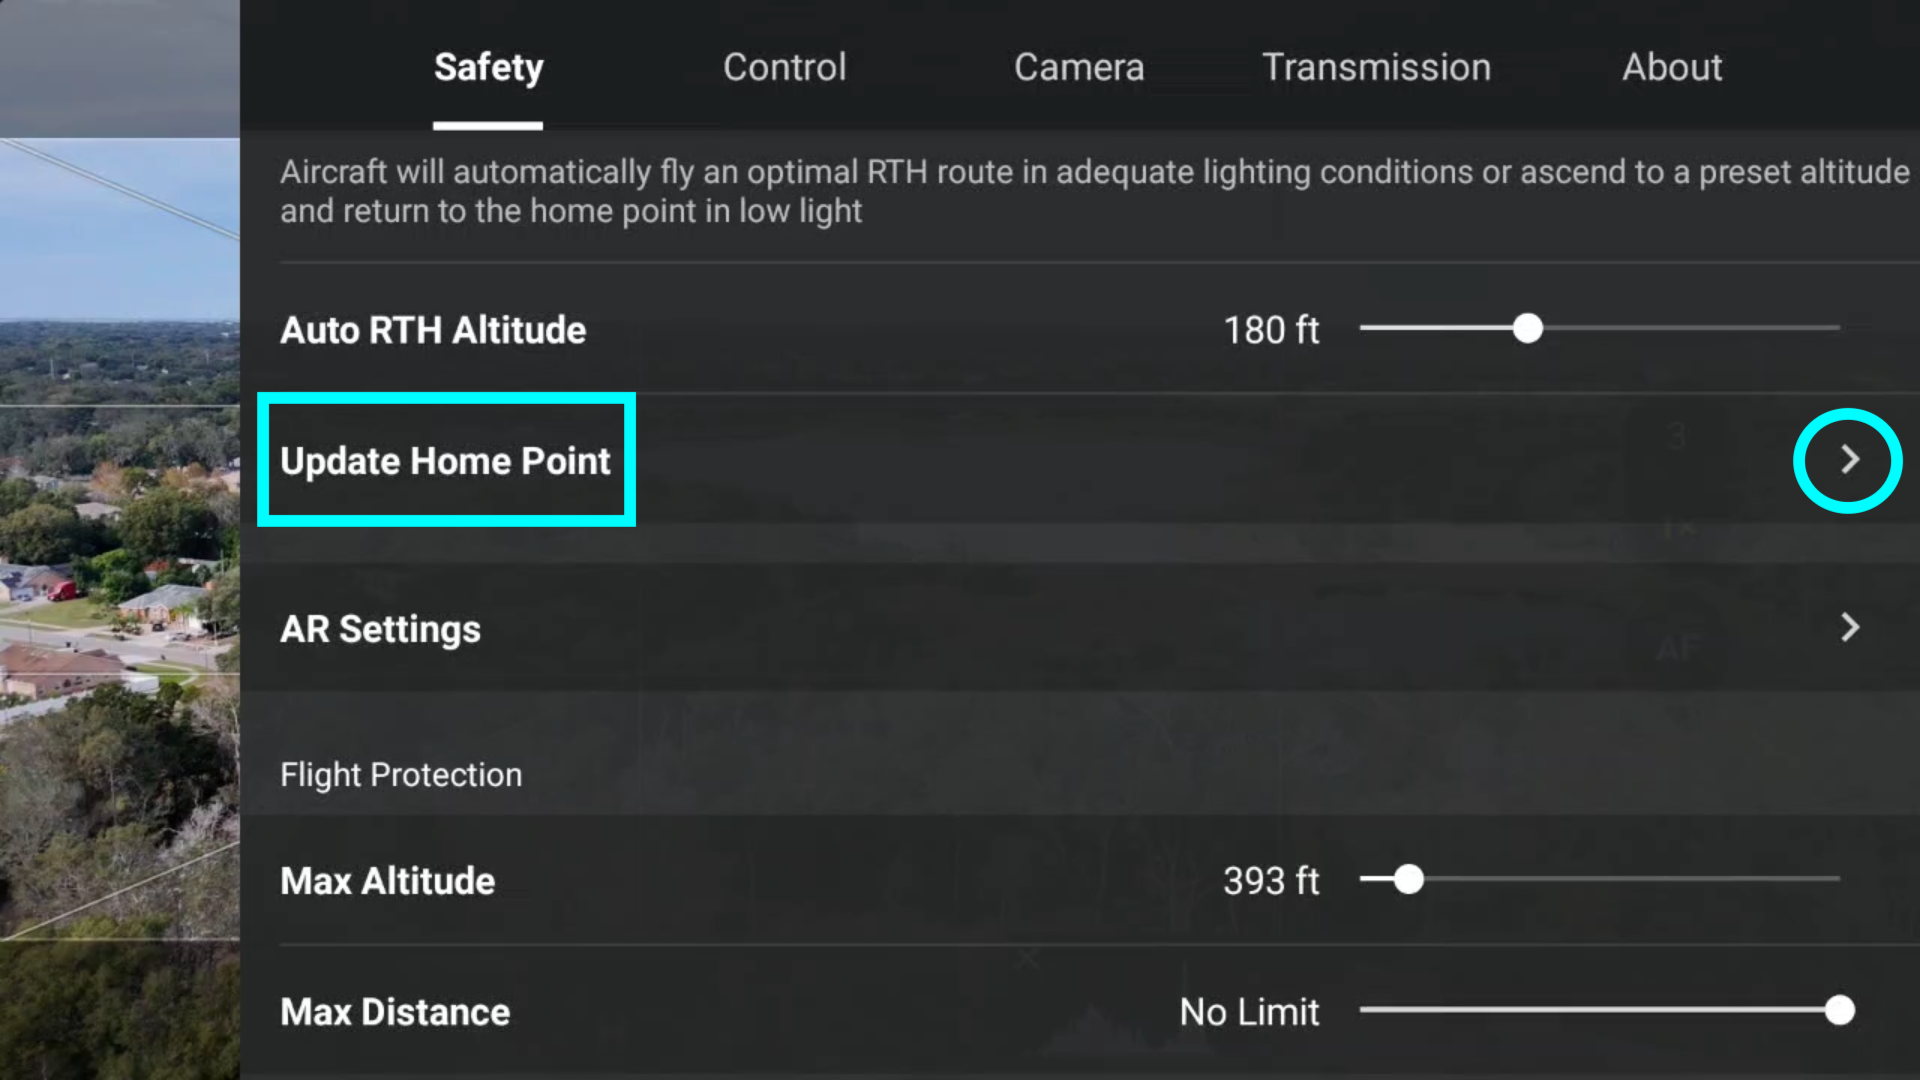

STEP 2: A map of your immediate location will populate the center of the screen. Drag the screen until the yellow H moves to your new desired home point location. When done, simply press OK, and the new home point will be updated.
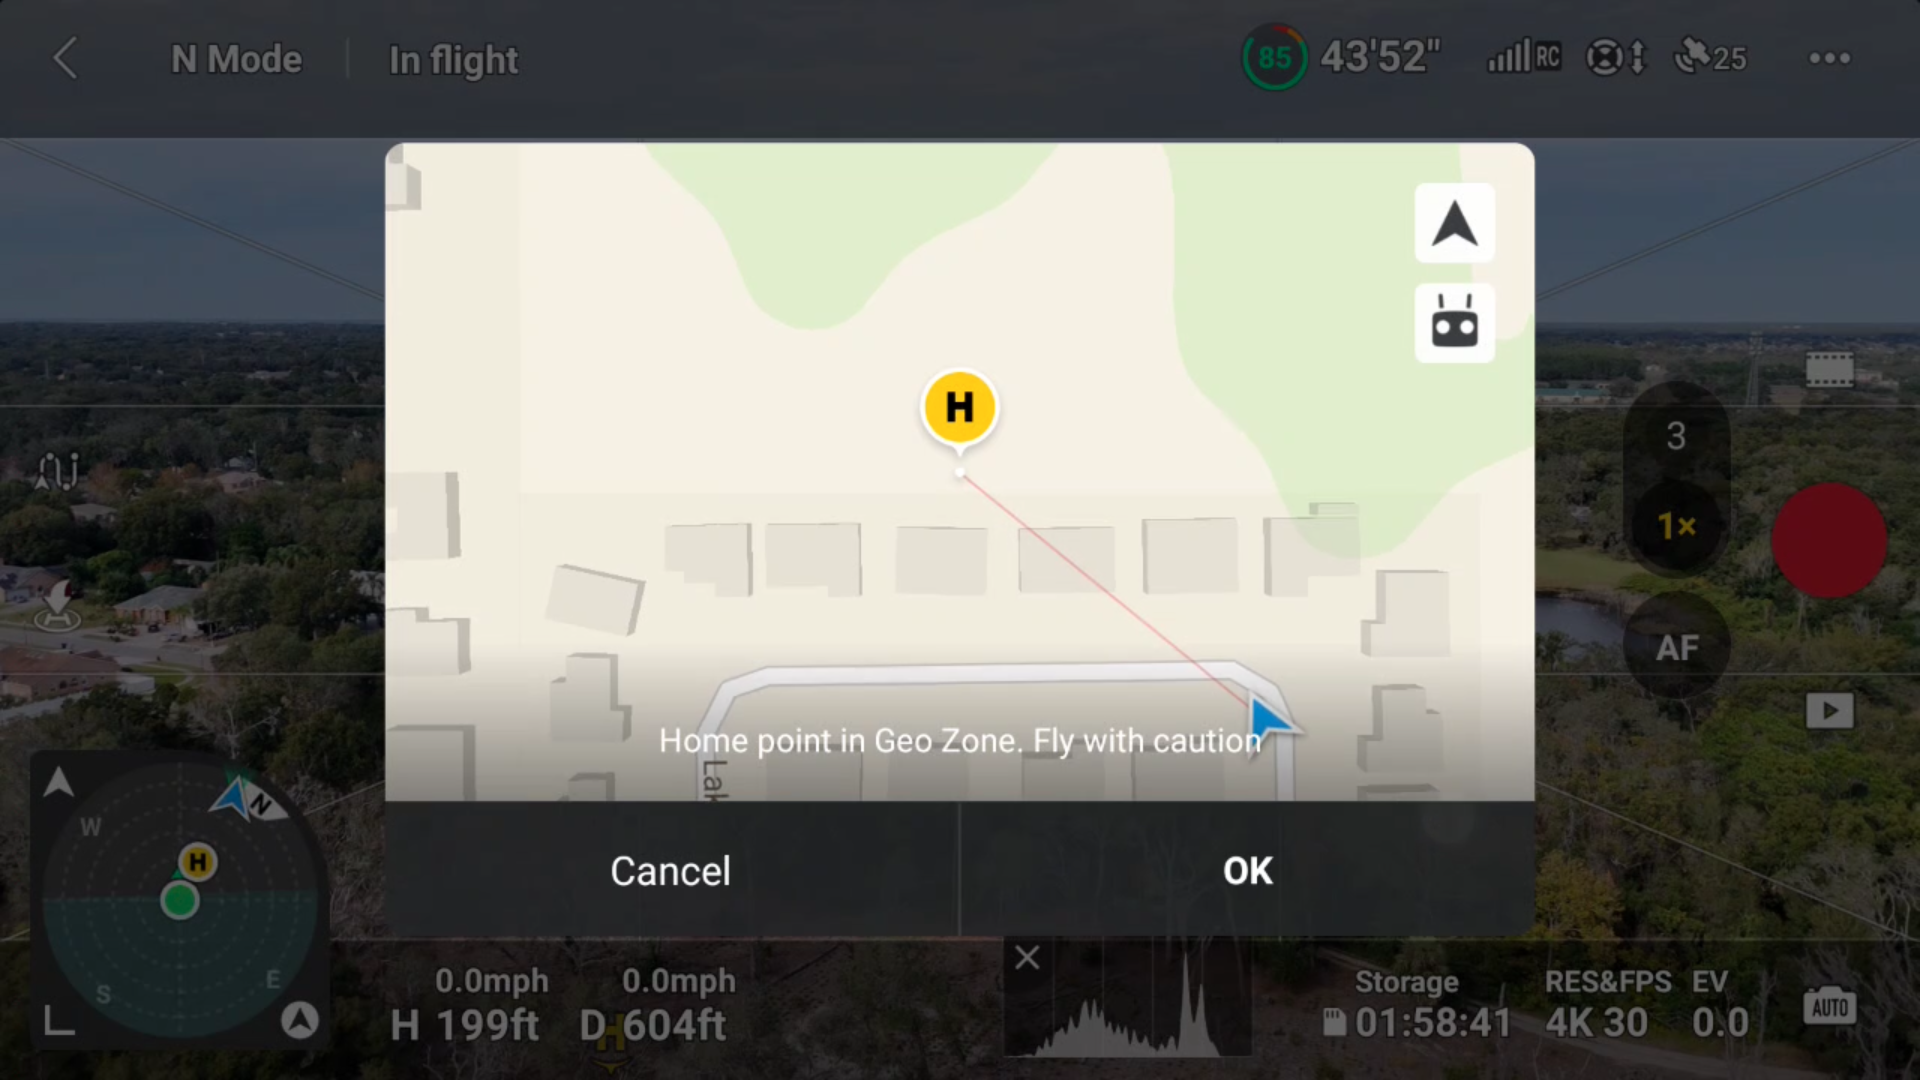

If you’d like to set the home point back to where it was, simply do the above steps in reverse.
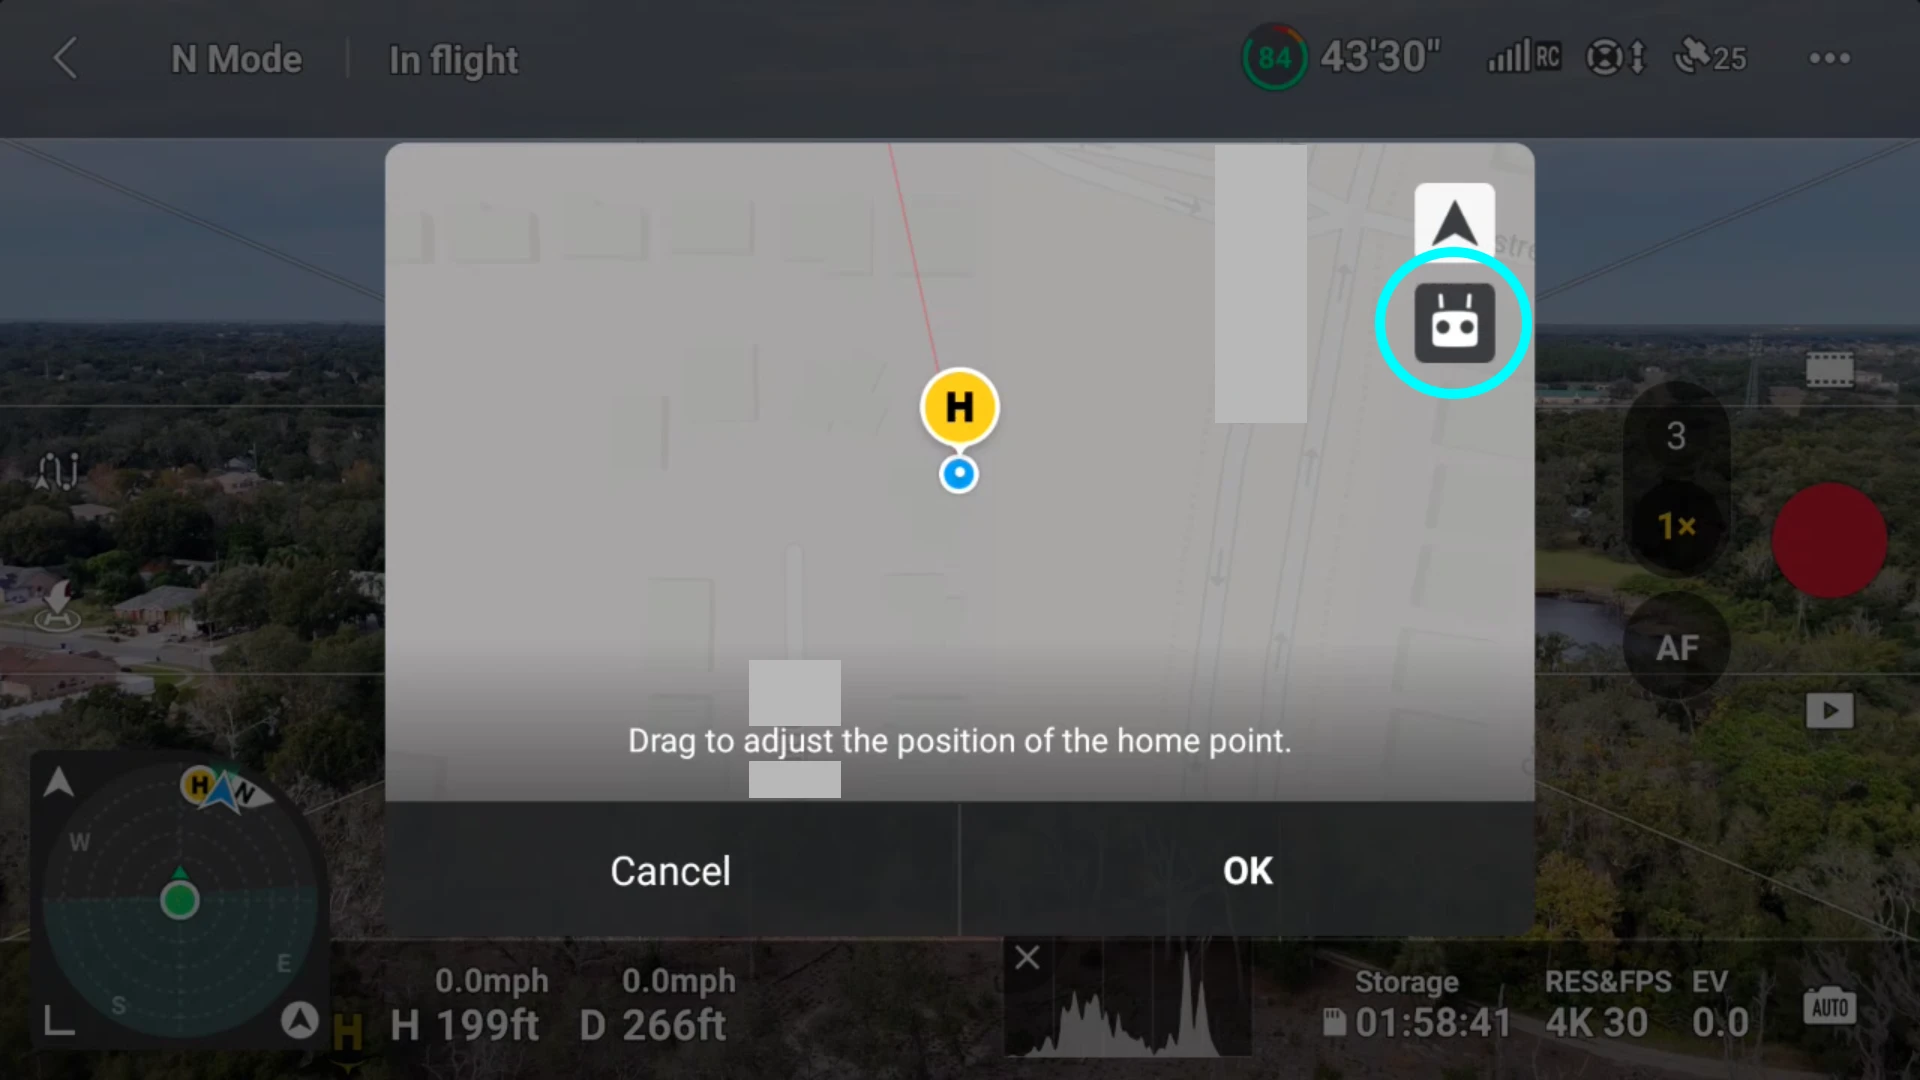
You can also set the home point to be where the Remote Controller is currently located. One scenario for this would be when covering areas rapidly while in a vehicle or on a boat.
To update the home point to the remote controller, while in the “Update Home Point Map”:
Tap the Remote Controller icon. The Home Point will then be set to the exact location where the RC is currently.

» MORE: DJI Mini 3 Pro: How to Set Up Safety Features (Video)
AR Settings
The Mini 4 Pro benefits from the inclusion of AR (augmented reality), displaying on-screen overlays to assist with home point identification and return-to-home functions.

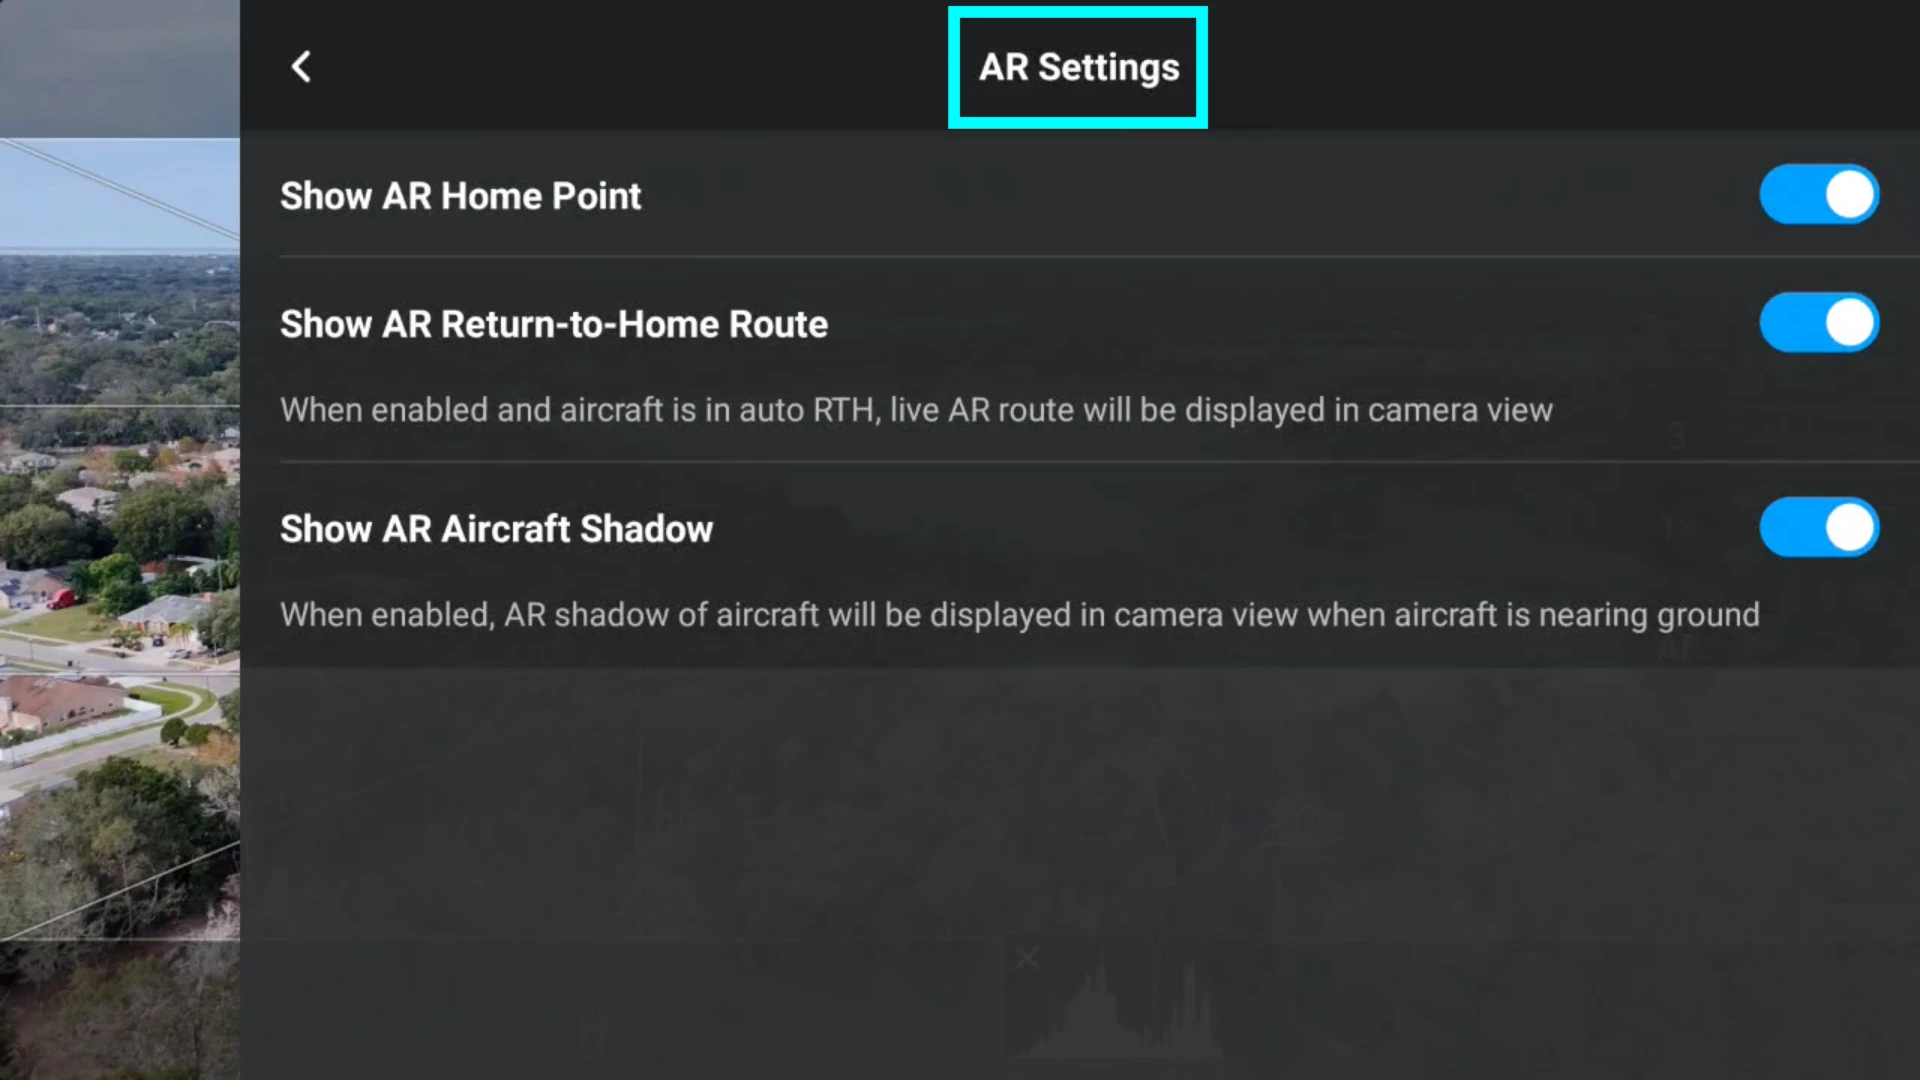
With Show AR Home Point options on, you will see a virtual H on the Live View screen representing the Mini 4 Pro home point, which can be seen in all of the map views.
With the Show AR Return-to-Home route option enabled, there is a green path showing what route the Mini 4 Pro will take to RTH.
Lastly, when landing, there is also a virtual “Mini 4 Pro” shadow on-screen showing where the Mini 4 Pro will exactly land. This is called Show AR Aircraft Shadow.
Flight Protection
This section is used to define how far and high the Mini 4 Pro will fly at any given time. Although our intention may be to stay within the confines of the law when in flight, this might be difficult to maintain.
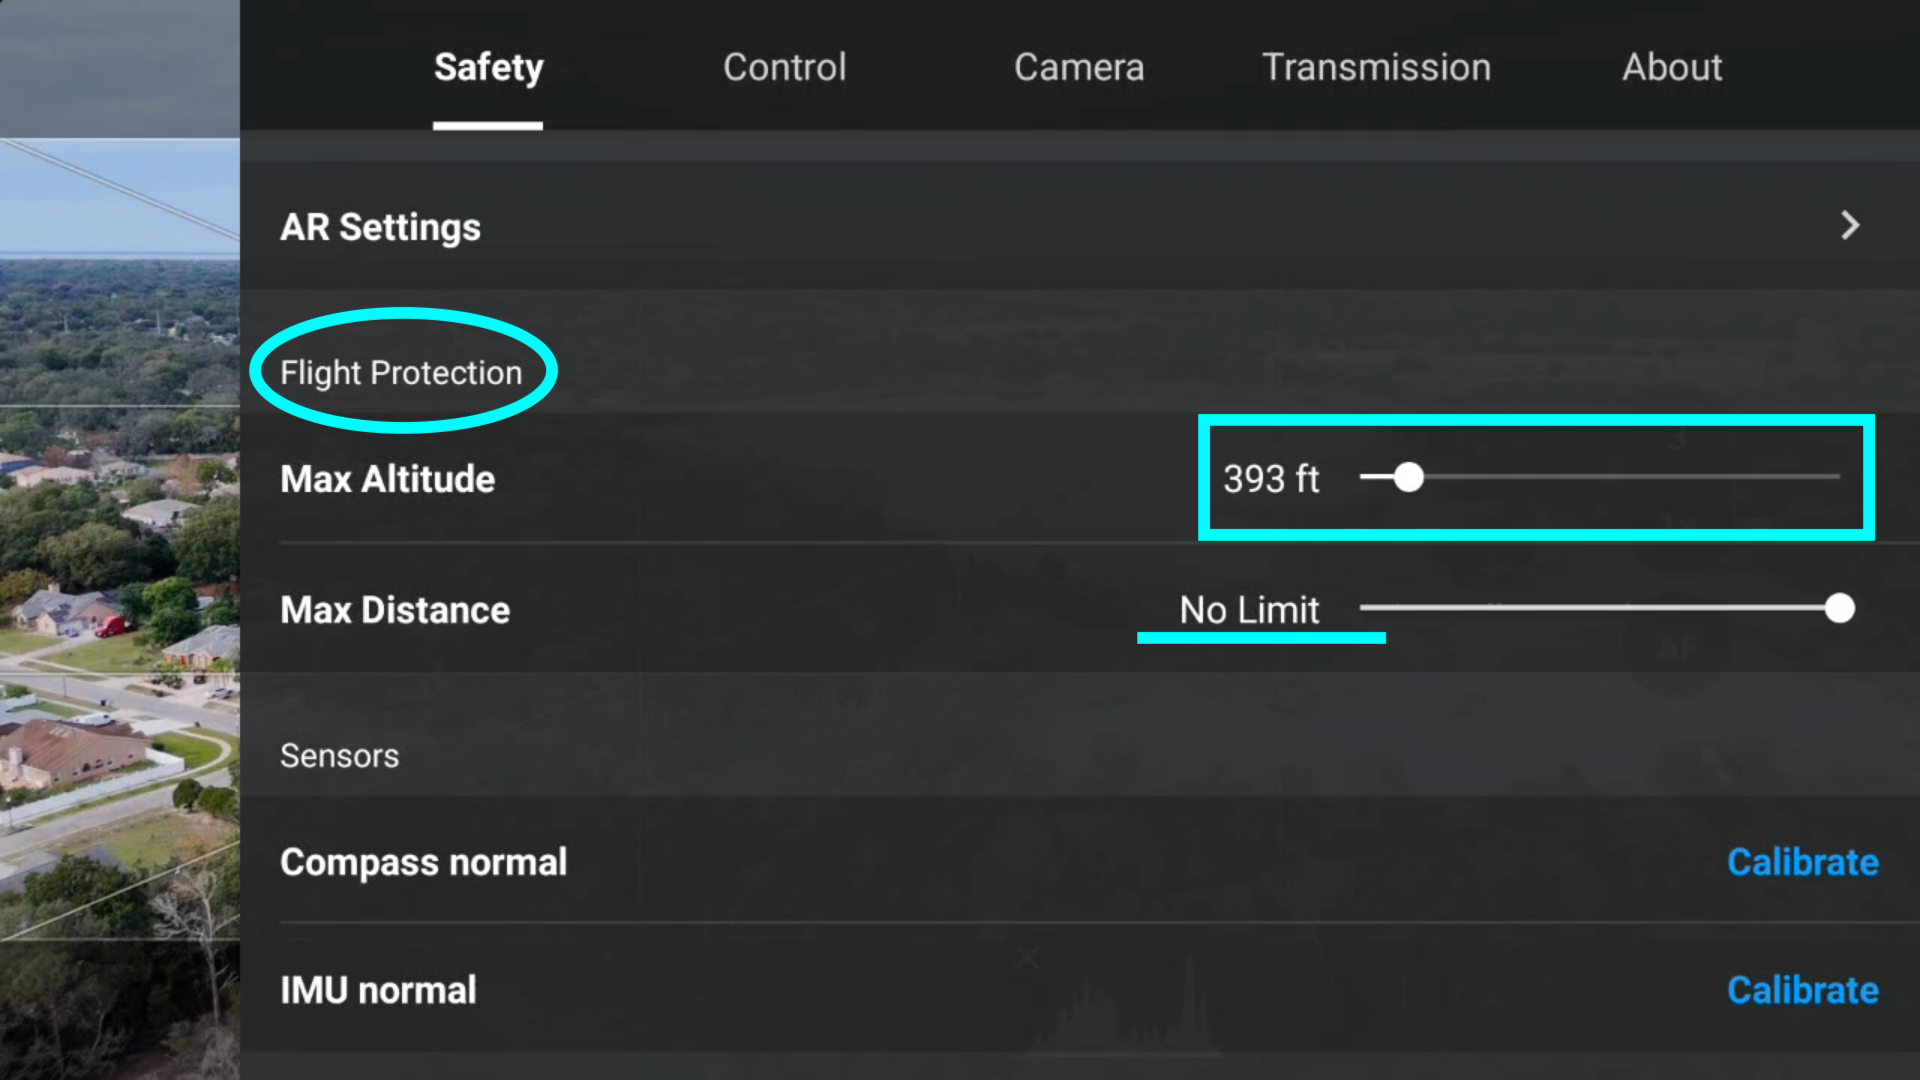

Max Altitude
If you are in the United States, because it is illegal to fly above 400 feet, you may choose to set the maximum altitude to anything under 400 feet.
If you are in a country that regulates the maximum altitude that you can fly, likewise, you’ll want to set that number here.
» MORE: How High Can I Fly My Drone? (Answered)
Max Distance
Additionally, you can also set the maximum distance.
If you are concerned about flying too far out, you can set the value to any number you’d like. If distance isn’t a concern, this can be set to No Limit.
» MORE: How Far Can DJI Drones Fly (A Complete List)
Advanced Safety Settings
Advanced safety settings determine how the Mini 4 Pro behaves when the Mini 4 Pro disconnects from the remote controller.
Disconnects can occur due to variants in the environment, such as tall trees, mountains, canyons, or even signal interference and loss due to buildings.
Signal Lost
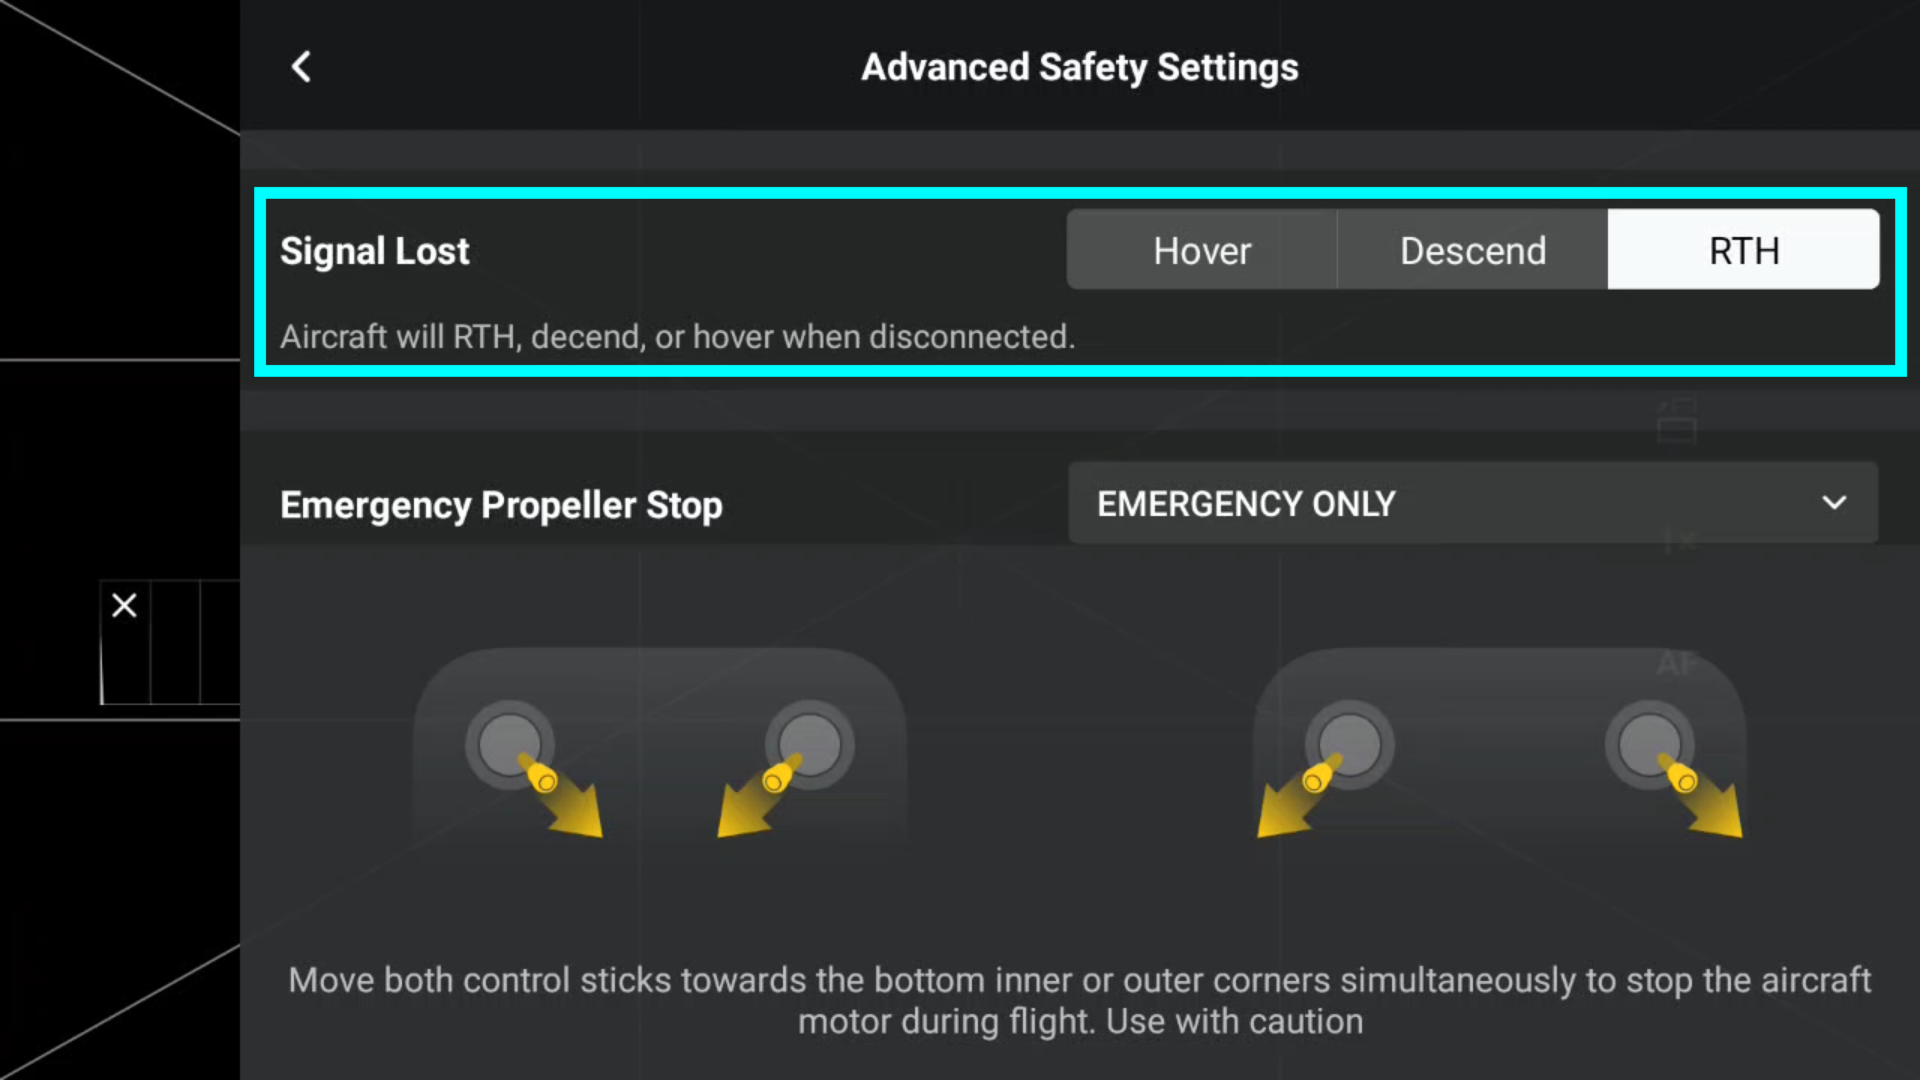

Signal loss options are as follows:
- Hover – The Mini 4 Pro will stay in one place until it receives input from you. You may have to go to the location of the Mini 4 Pro to regain a connection.
- Descend – The Mini 4 Pro will descend and land, even if the signal was lost over water.
- RTH – The Mini 4 Pro will return to the home point, regardless of the surroundings.